

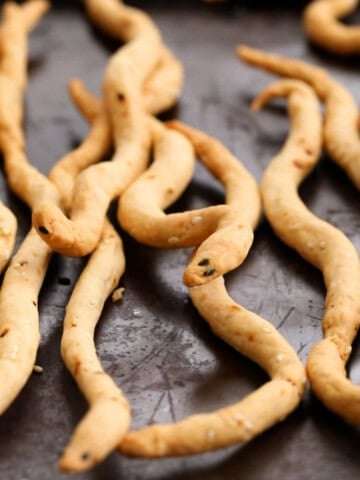
This Toasted Tortellini is cheese tortellini coated in seasoned panko breadcrumbs, then oven-baked to crispy, golden perfection. This fun and unique appetizer is a breeze to prepare, thanks to my simple breading process.

What is toasted tortellini? If you're familiar with breaded ravioli, a popular restaurant favorite, then toasted tortellini is a delicious twist—using cheese tortellini instead of ravioli. While traditional recipes often call for deep frying, we bake ours in the oven, achieving an irresistibly crunchy exterior, similar to the baked bang bang cauliflower.
This dish makes the perfect party appetizer, especially when paired with marinara or garlic parmesan sauce for dipping. It also works wonderfully as a light meal, served alongside roasted vegetables and a fresh side salad.
Jump to:
Why you'll love it?
- Oven Baked
- Irresistibly crispy and crunchy exterior
- Perfect appetizer for parties or a light meal
- Serve with your favorite dipping sauce
- Ideal for the holidays
Refrigerated, frozen, or dried tortellini?
Tortellini comes are available in the fresh, frozen, or dried pasta sections of most grocery stores. For this toasted tortellini recipe, we recommend using refrigerated tortellini. The dough is more pliable and has a slightly higher moisture content compared to frozen or dried varieties, which allows the breading to adhere better and creates a perfectly crispy crust without falling apart.
Frozen tortellini, on the other hand, can become more delicate when thawed, and the dough may become soggy or break during the breading process. However, you can use frozen variety, but increase the blanching to time by a few minutes.
Which variety of tortellini should you use?
Most grocery stores offer a wide variety of tortellini, with options like cheese, three or four-cheese blends, meat, spinach and ricotta, or chicken fillings. For this recipe, we prefer any variety of cheese-filled tortellini.
The cheese filling provides moisture, keeping the interior soft and creamy even after baking. As the cheese melts, it softens, making the tortellini more forgiving during frying. Unlike meat fillings, cheese is less likely to dry out, ensuring a tender, flavorful bite.
How to make toasted tortelinni?
You can find full printable recipe below, but here is a quick overview of the procedure along with step-by-step photos.
Blanch the tortellini
Bring a large pot of water to a boil. Add the refrigerated cheese tortellini and cook for 2 to 3 minutes, stirring occasionally. The tortellini will begin to float to the surface.
We want to partially cook the tortellini, not fully cook it. Drain the tortellini thoroughly, then spread it out on a large plate to cool completely. Be sure there's no water remaining before moving on to the breading process, as any excess water will dilute the egg batter.


Want To Save This Recipe?


Serving suggestions
These toasted tortellini have a perfectly crunchy exterior, while the cheesy filling is soft and gooey when hot out of the oven. For the best experience, serve them straight from the oven, piping hot, with marinara sauce for dipping.
👩🍳 Pro tip: The exterior may become chewy if left at room temperature for a while. If you're not serving the oven toasted tortellini immediately, I recommend taking them out of the oven when they’re a pale golden color, without letting them brown too much. This way, the outside will stay soft and tender even after a few hours, though it won't have the same crunch.
Recipe tips
- Use cheese tortellini for best tasting bite.
- Use refrigerated tortellini for the best texture.

More appetizer ideas


Toasted Tortellini
Equipment
Ingredients
- 10 ounces refrigerated cheese tortellini
- 2 eggs, large
- ¼ cup all purpose flour
- ¾ teaspoon salt
- ¼ teaspoon ground black pepper
- 1 cup panko breadcrumbs
- 6 tablespoons parmesan cheese
- 1 teaspoon dried parsley optional
- ½ teaspoon red pepper flakes optional
Instructions
Blanch tortellini
- Bring a large pot of water to a boil. Add the tortellini and cook for 2 to 3 minutes, stirring occasionally. The tortellini will begin to float to the surface.
- Drain the tortellini thoroughly, then spread it out on a large plate to cool completely. Be sure there's no water remaining before moving on to the breading process, as any excess water will dilute the egg batter.
Bread and Bake
- Preheat oven to 400°F and grease a large baking sheet with cooking spray and set aside.
- Add the panko, parmesan, red pepper flakes and dried parsley into a mini food processor and process for few seconds. This ensures a more uniform coating. Transfer into a bowl.
- In a larger bowl, combine the eggs, flour, salt, and pepper. Whisk until smooth and free of lumps. Add the tortellini and toss until each piece is evenly coated with the batter.
- Working with one tortellini at a time, dredge into the panko-parmesan mixture, turning and pressing on all sides to coat evenly and place in the prepared baking sheet.
- Spray the tops with a coating of cooking spray and bake for 15 to 20 minutes, until golden brown in color.
- Serve hot with marinara sauce for dipping.
Notes
Nutrition
Nutritional information, based on third-party calculations, should be seen as estimates, not guarantees, as various factors like product types, brands, processing methods, and more can alter the nutritional content in recipes.
All contents and images are my original work, unless and otherwise mentioned. Please do not use my recipes or images without linking back to www.kitchenathoskins.com. If you wish to republish a recipe, please rewrite in your own words and don’t forget to include a link back to the original recipe.

Kelly @ Kelly Lynns Sweets and Treats
I love these little bites of heaven! Totally perfect for a snack or holiday party appetizer...as long as I don’t eat them all before the guests arrive hehehe 🙂
Maria Doss
I totally get ya!! I finished almost half of it before even it got to the table:) Thanks Kelly.
Kelsie | the itsy-bitsy kitchen
SOOOO GOOD, Maria! They look amazing!
Maria Doss
Thank you Kelsie:)
Deepika|TheLoveOfCakes
So yummmyyy!! Crispy heavenly bites!! These sound like the perfect snacks for get-togethers! I wouldn't mind eating that plate alone though!!
Maria Doss
Thank you dear:)